
Custom Labels
Custom Labels is a self-managed workspace that lets you assign values to your Google custom label fields (custom_label_0 through custom_label_4), the fields most commonly used for campaign segmentation, like tagging products by price tier, margin, or seasonal cohort so you can target and bid on them separately. You search for the products you want, choose which label field to set and what value to give it, preview exactly what will change, and publish, all in one place.
This guide walks through how the workflow works, how to see which rules are governing a field, how to manage the rules you’ve created, and how to escalate to support when needed. Most of it you can do yourself. A Support Specialist is available if you’d rather have the team handle it.
Open the workspace
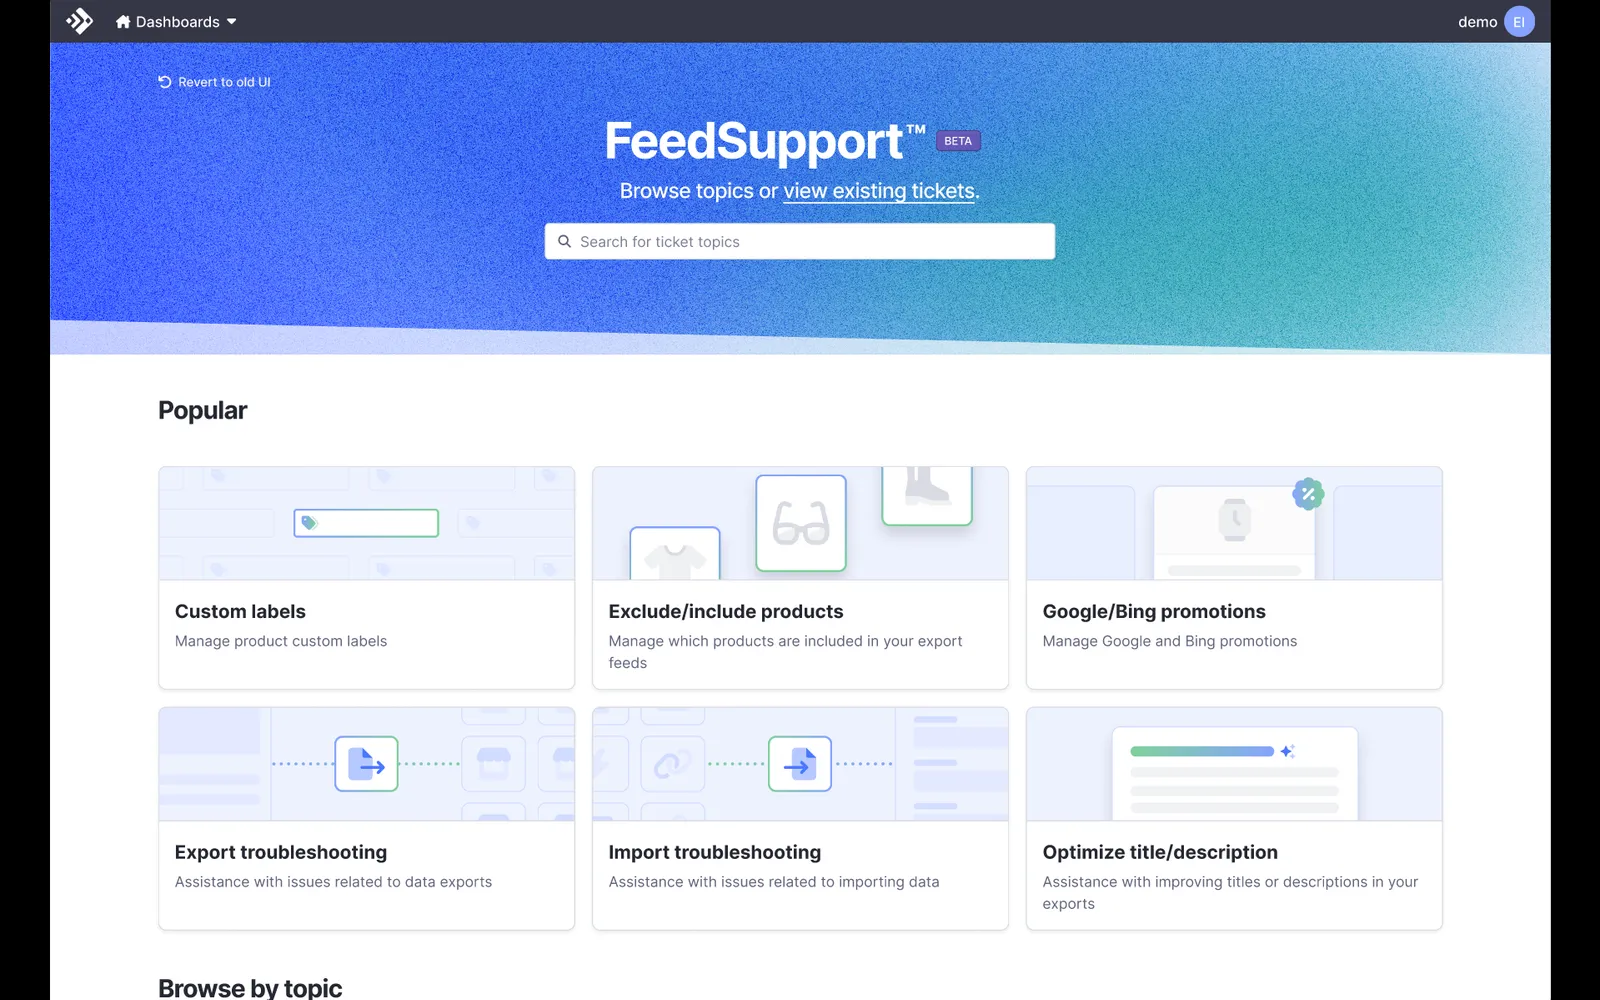
You can reach the workspace from the FeedSupport Portal by selecting the Custom Labels tile, or directly from the Workspace tab on your Data Page.
Select the Custom Labels tile
On the FeedSupport Portal home screen, find Custom Labels under Popular and select it. It sits alongside other self-managed tiles like Exclude/Include Products and Google/Bing Promotions. This opens the Feedonomics workspaces launch page with the Workflow already set to Custom Labels, so you don’t need to pick a mode yourself.
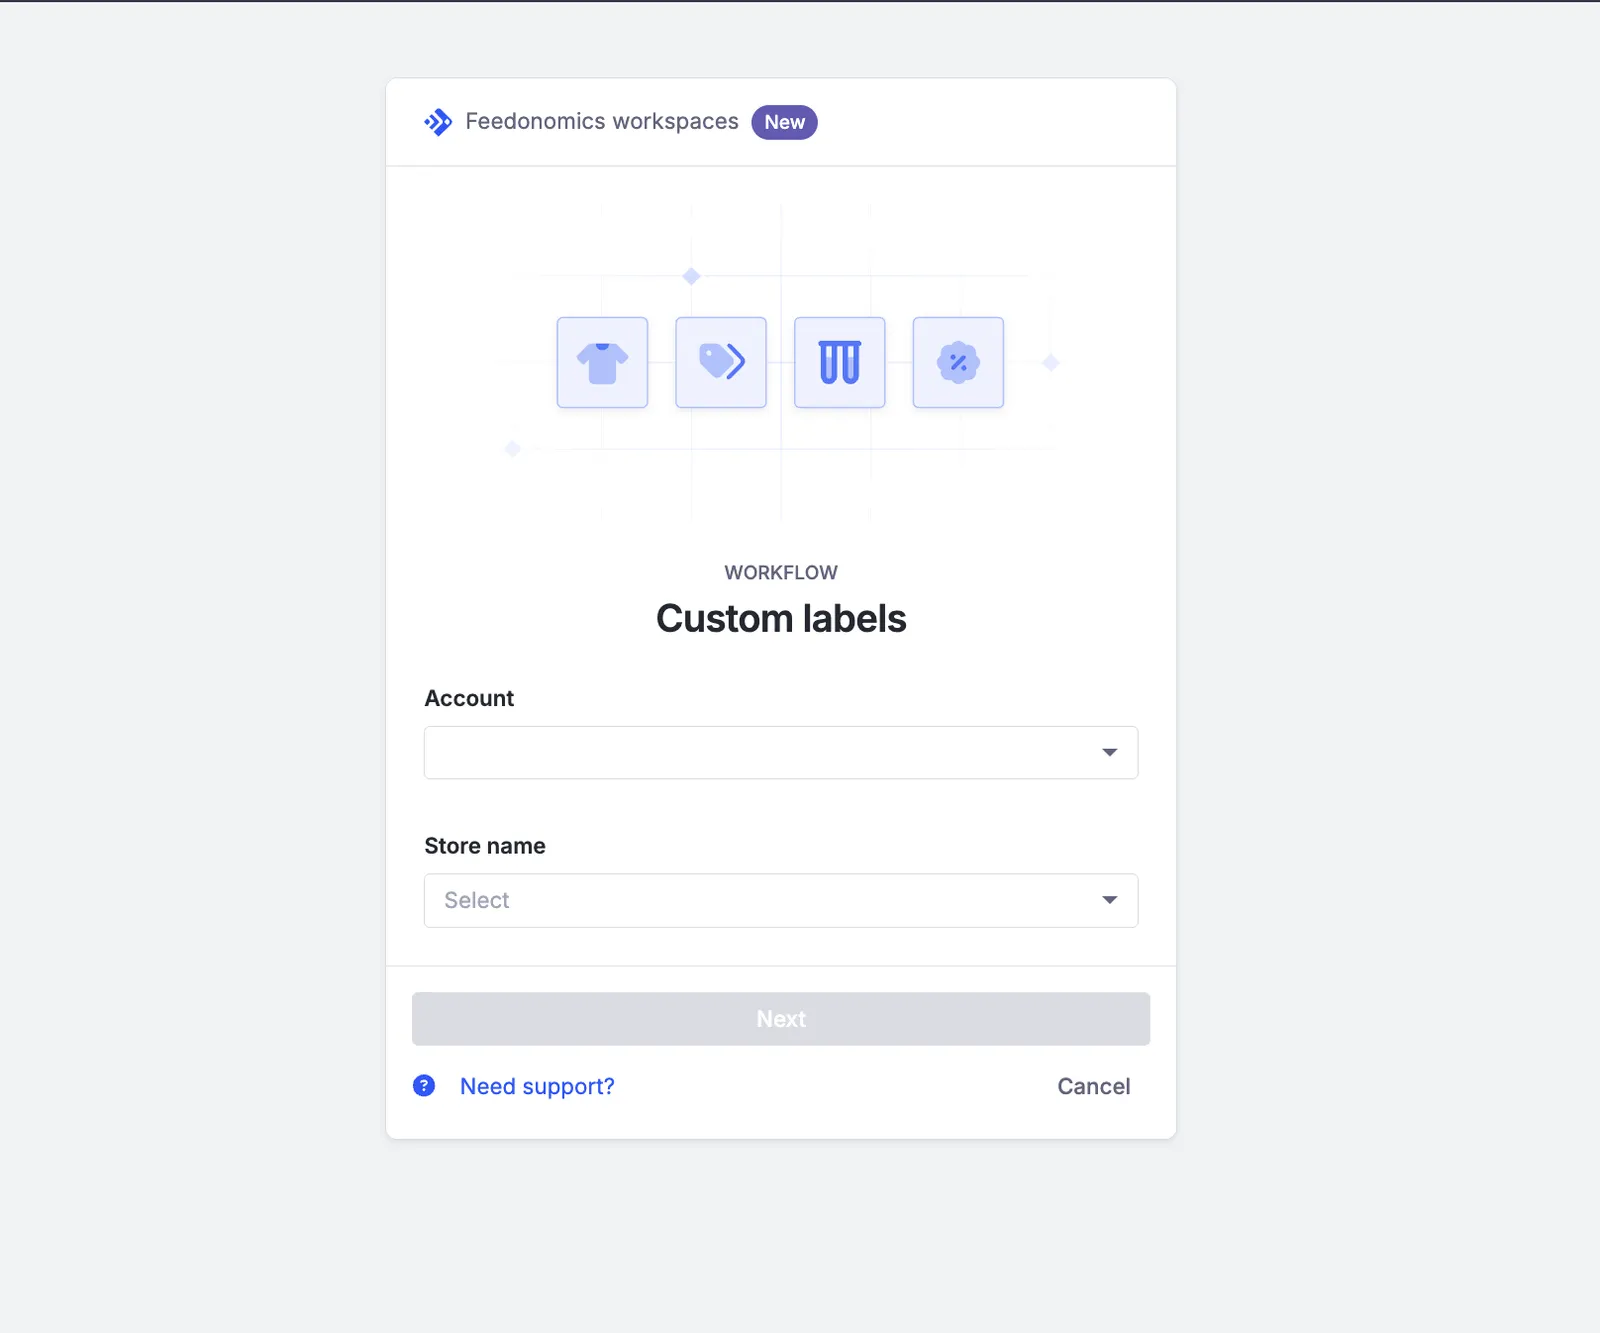
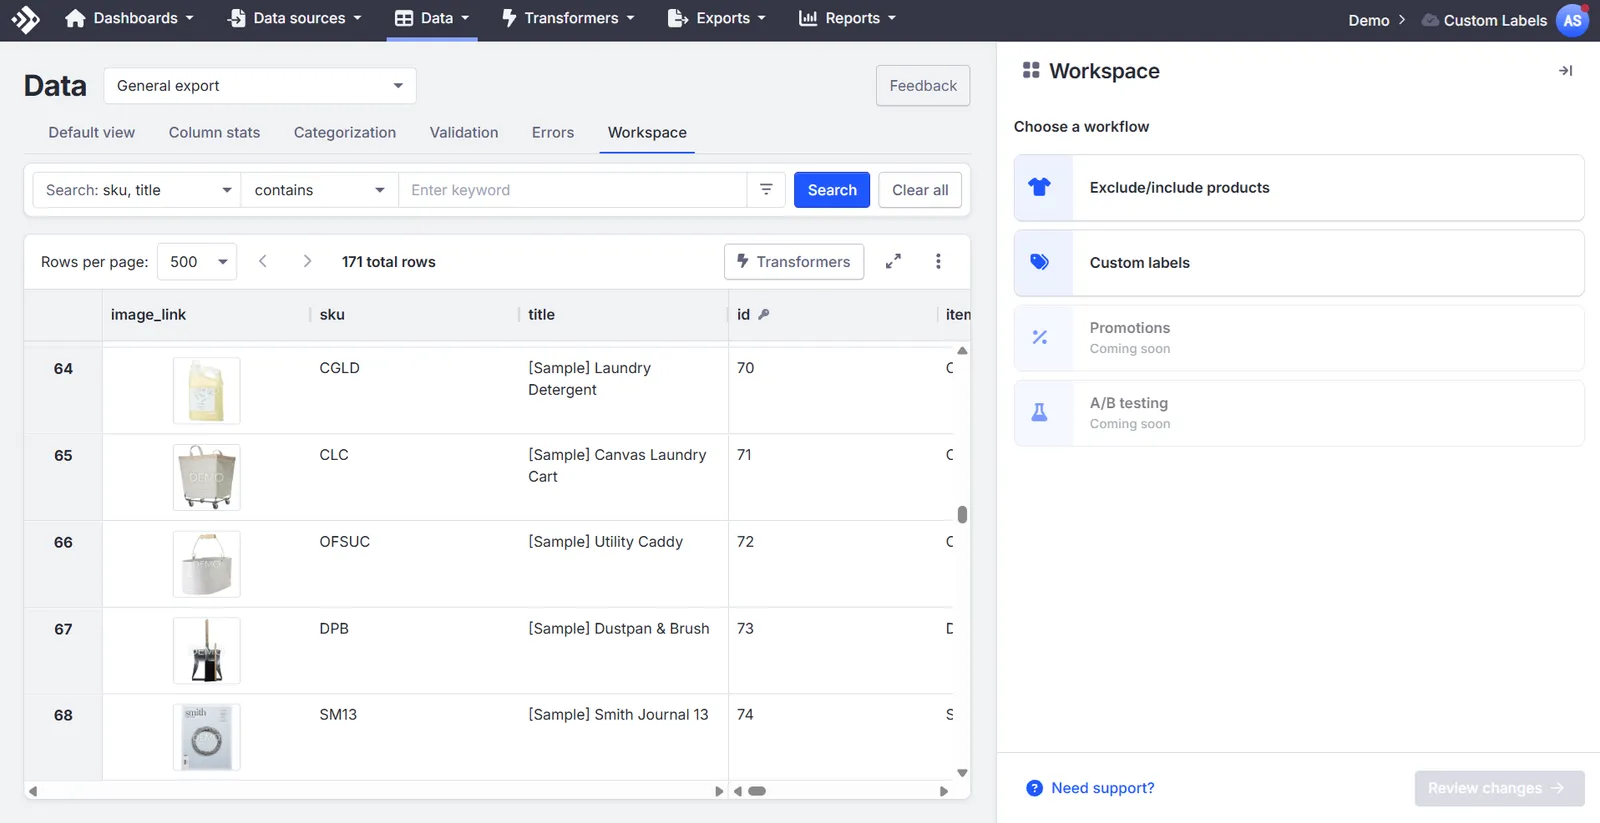
If you’re already on your Data Page, open the Workspace tab and select Custom Labels as the workflow. The Workspace tab is only available on the General Export page. It does not appear on the raw data page or on an individual export-specific page.
The five-step workflow
Every change follows the same pattern.
You might use Custom Labels to tag products for a seasonal campaign, or flag low-margin SKUs so you can bid on them differently, anywhere you’d otherwise ask Support to build a transformer just to stamp a value onto custom_label_0 through custom_label_4.
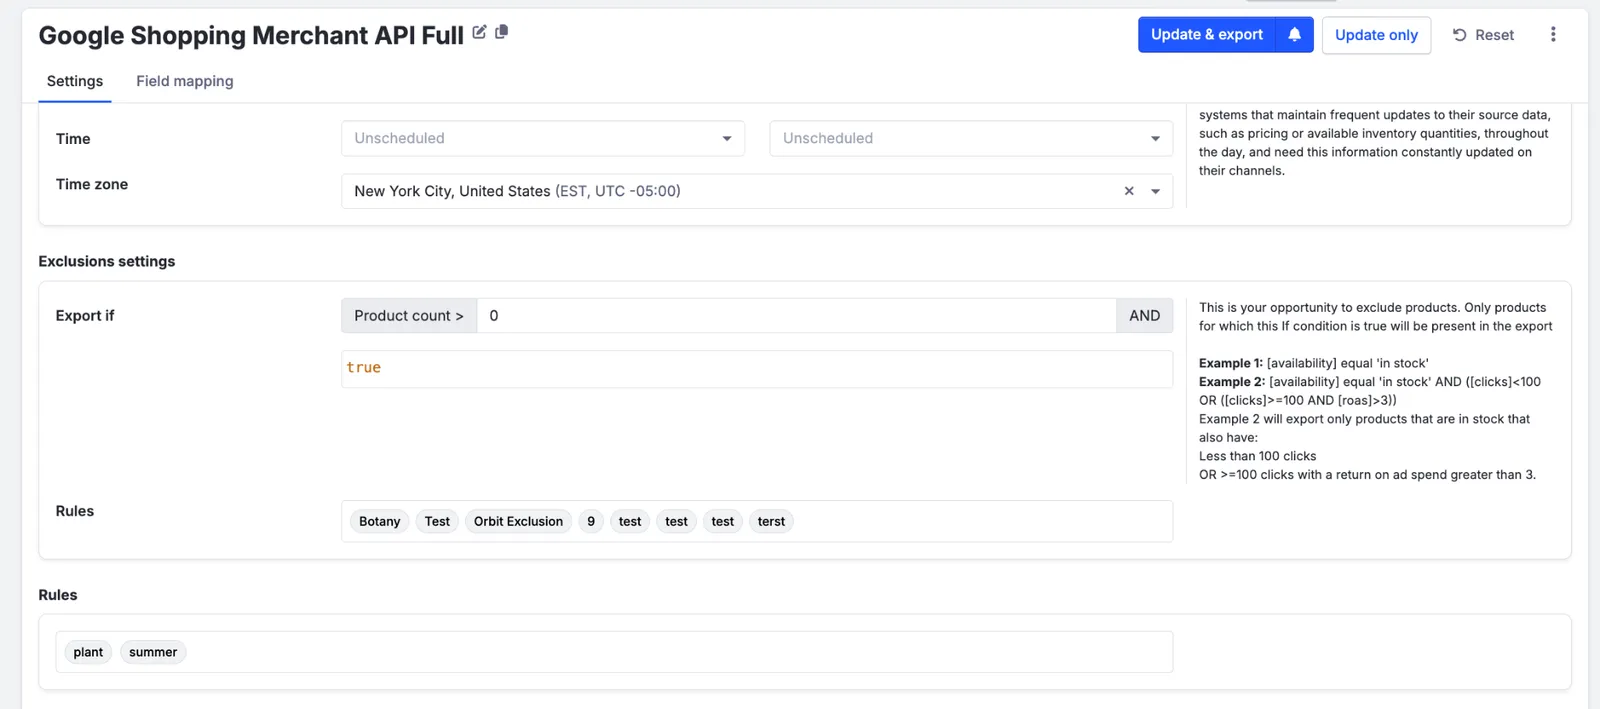
Nothing here builds a new transformer. Custom Label rules are added at the same level as your export’s existing export-if conditions, so everything affecting an export lives in one place, but a Custom Label rule and a transformer aren’t interchangeable. They aren’t listed in the Transformers tab or inside the Export If conditions themselves. You find and manage them in the Manage Rules tab of the workspace. On the export details page’s Settings tab, below Exclusions settings, a separate Rules field lists any Custom Label rules tied to that export, and selecting a rule takes you straight to it in Manage Rules.
Apply a custom label
Applying a label sets a value on one or more custom label fields for matching products, by creating a named rule.
Identify the products
Paste a SKU list, use an attribute filter (brand, category, price, product type, and so on), or enter SKUs manually. You can paste a list of SKUs directly into the search filter instead of building filters one by one.
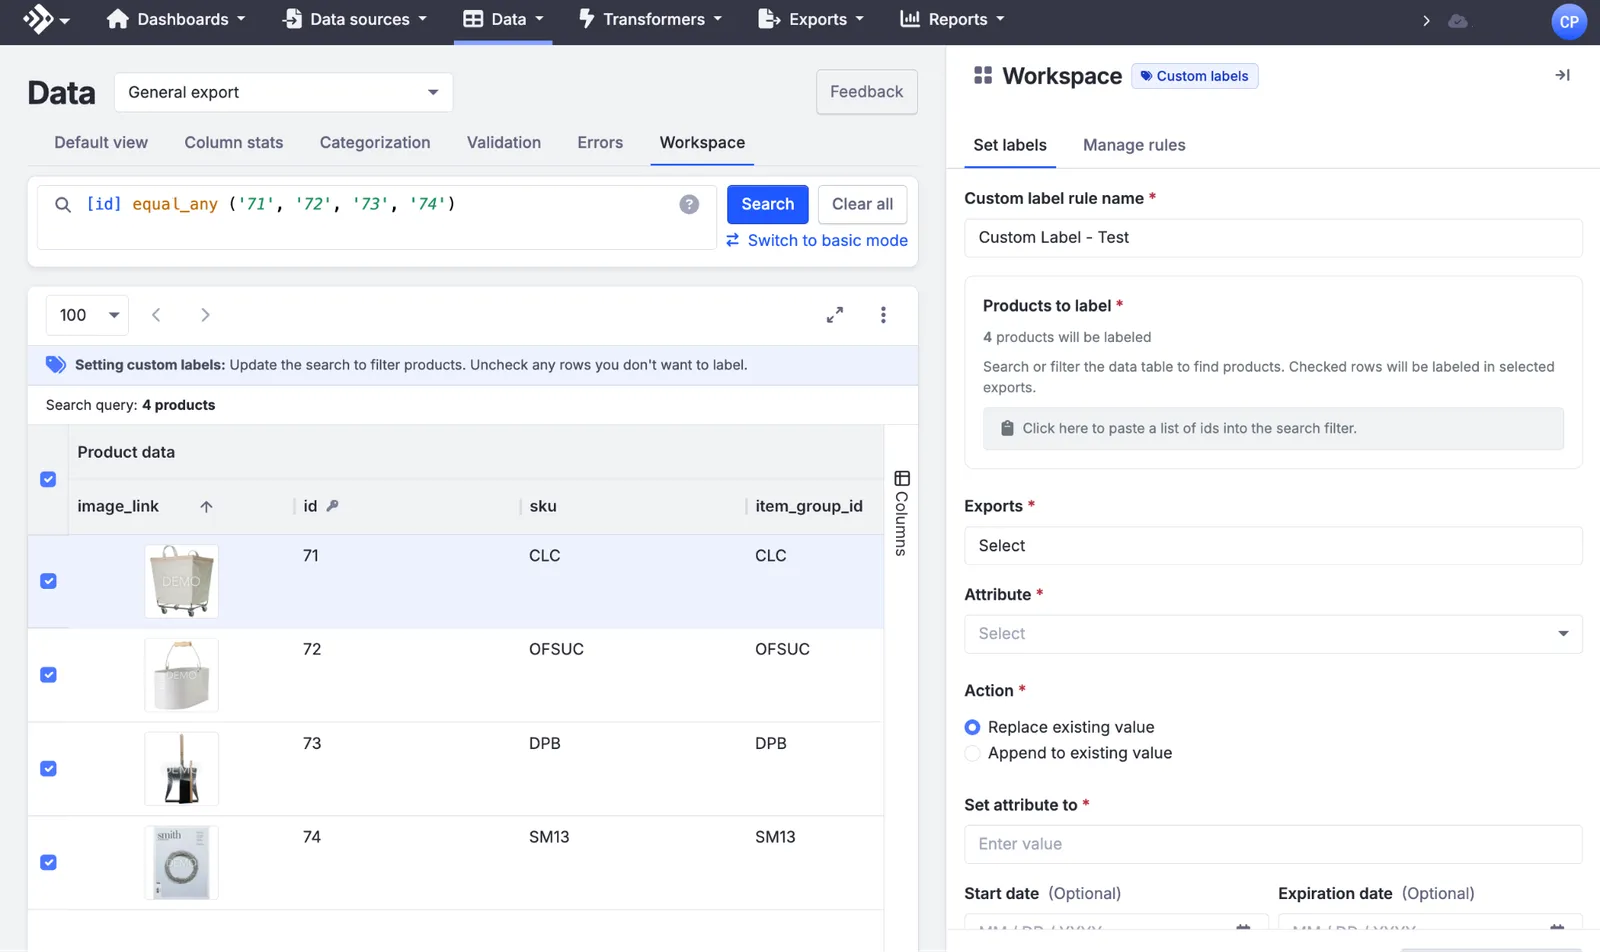
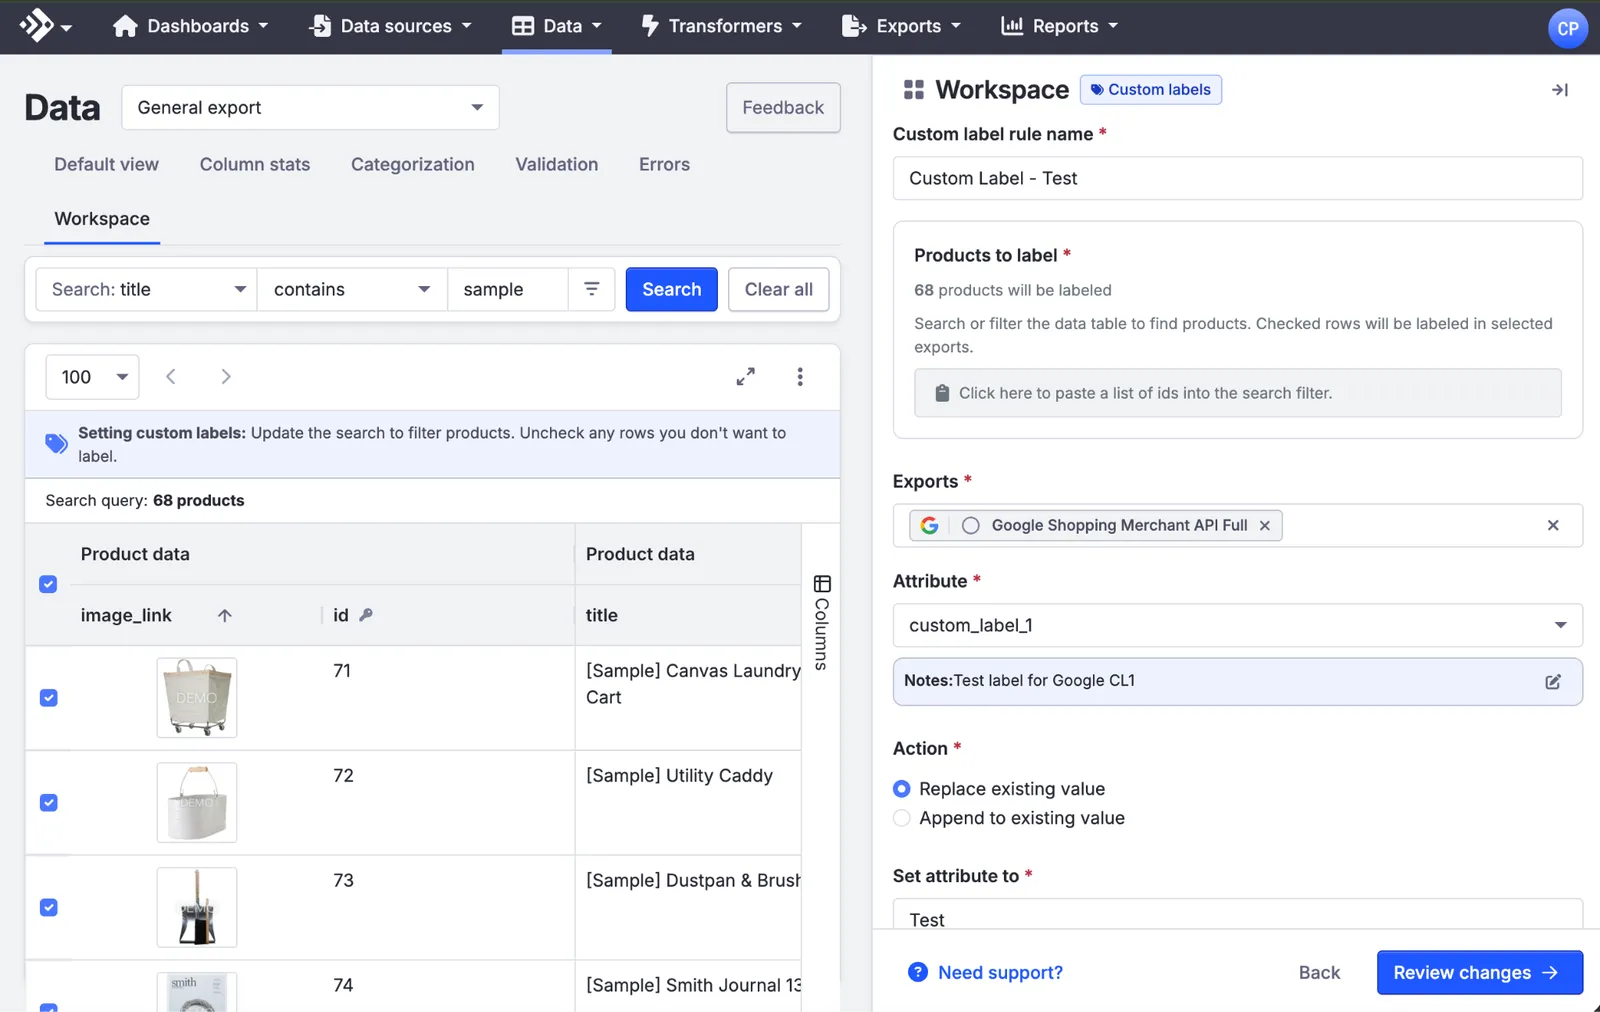
Confirm the criteria
Check that the criteria shown back to you match the products you intended to label.
Name the rule and set the label
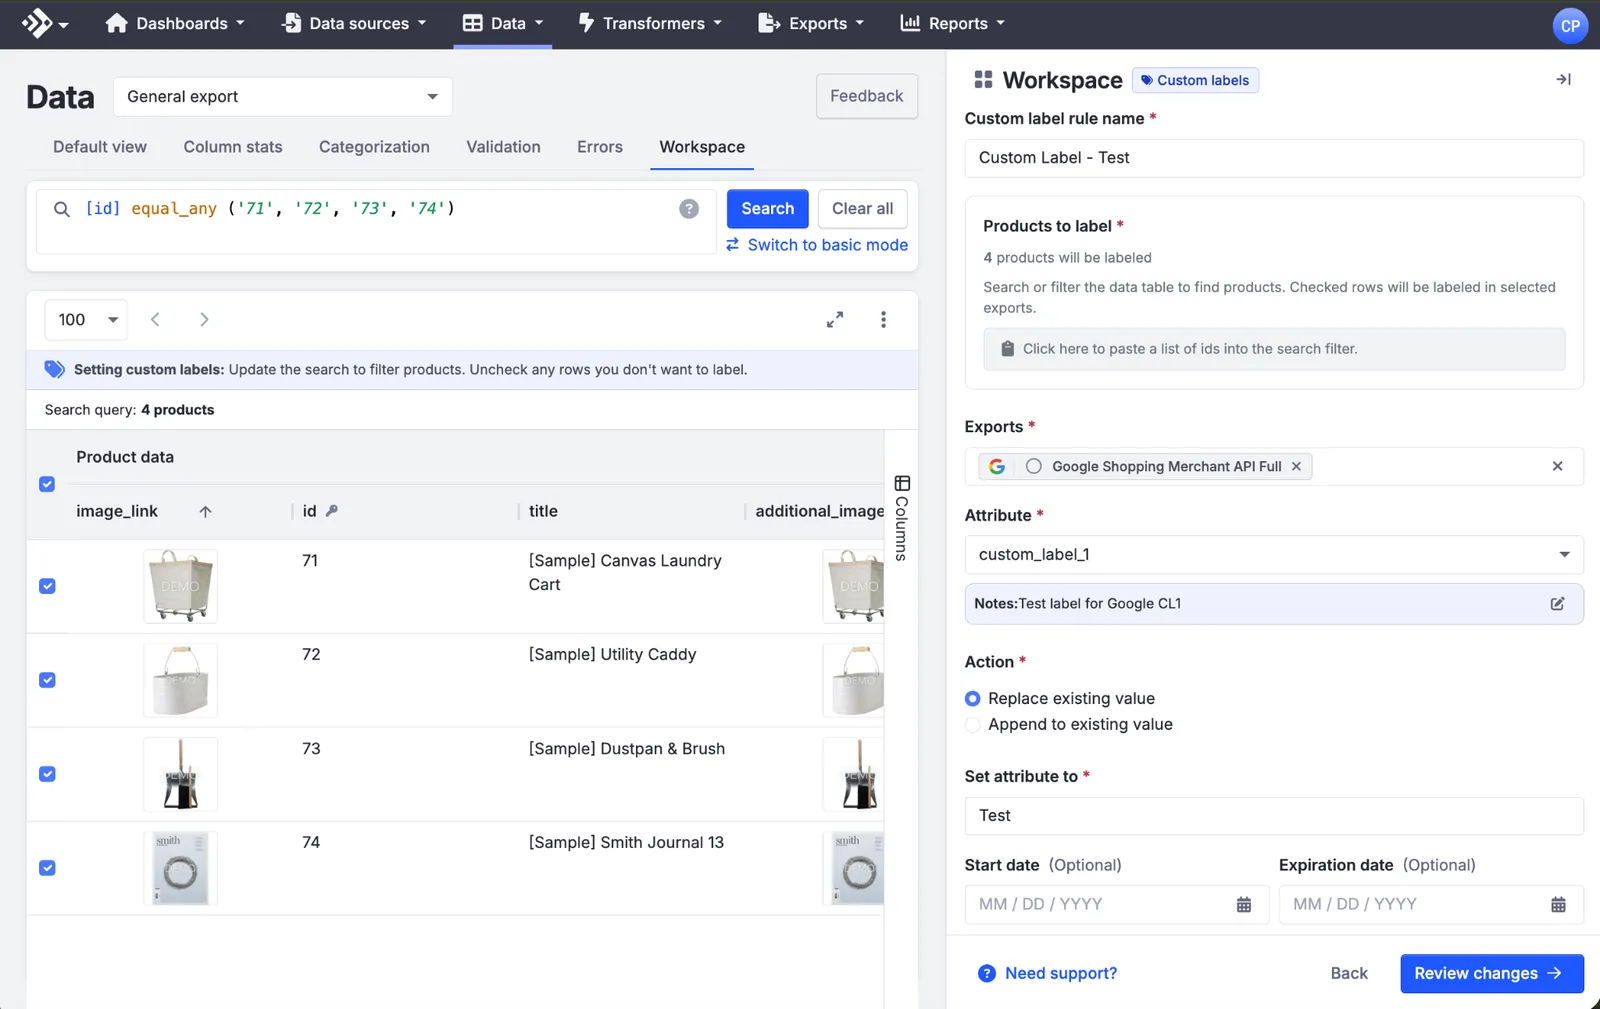
Name the rule, choose which export(s) it applies to, select the target field (custom_label_0 through custom_label_4), enter the value, and choose whether to Replace the existing value or Append to it. The Push export when changes are published toggle controls what happens when you save:
- On: the export runs immediately with your changes as soon as you select Save Changes.
- Off (default): your changes are saved, but the export won’t run until its next scheduled cycle. You can check when that is on the Exports List page.
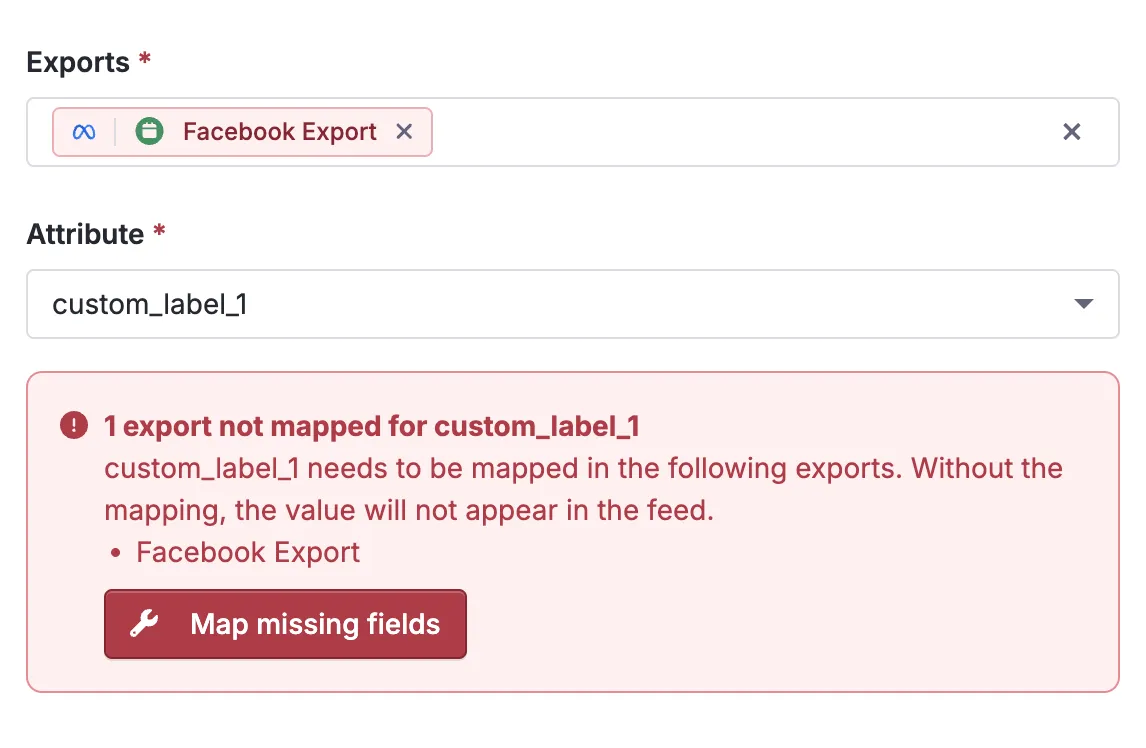
Custom label fields have to exist on the export before a rule can apply. If a selected export doesn’t have the target field mapped, you’ll see a warning like “1 export not mapped for custom_label_1.” Selecting Map missing fields checks whether the field already exists and maps it, or creates and maps it if it doesn’t.
Set start and expiration dates (optional)
Set a start date and an expiration date so the label cleans itself up automatically. When a rule expires, it’s turned off rather than deleted, so the rule and its history stay available if you need to reference it later.
Start and expiration dates take effect at midnight US Eastern Time on the date selected. If you need the rule to start or end at a specific time of day, submit a support ticket instead of using the date fields.
Preview the change
Use the review changes panel to see the rule summary and the current count, new count, and change for every export before anything goes live. The impacted-product count updates live as you adjust your search filters or manually check and uncheck rows.
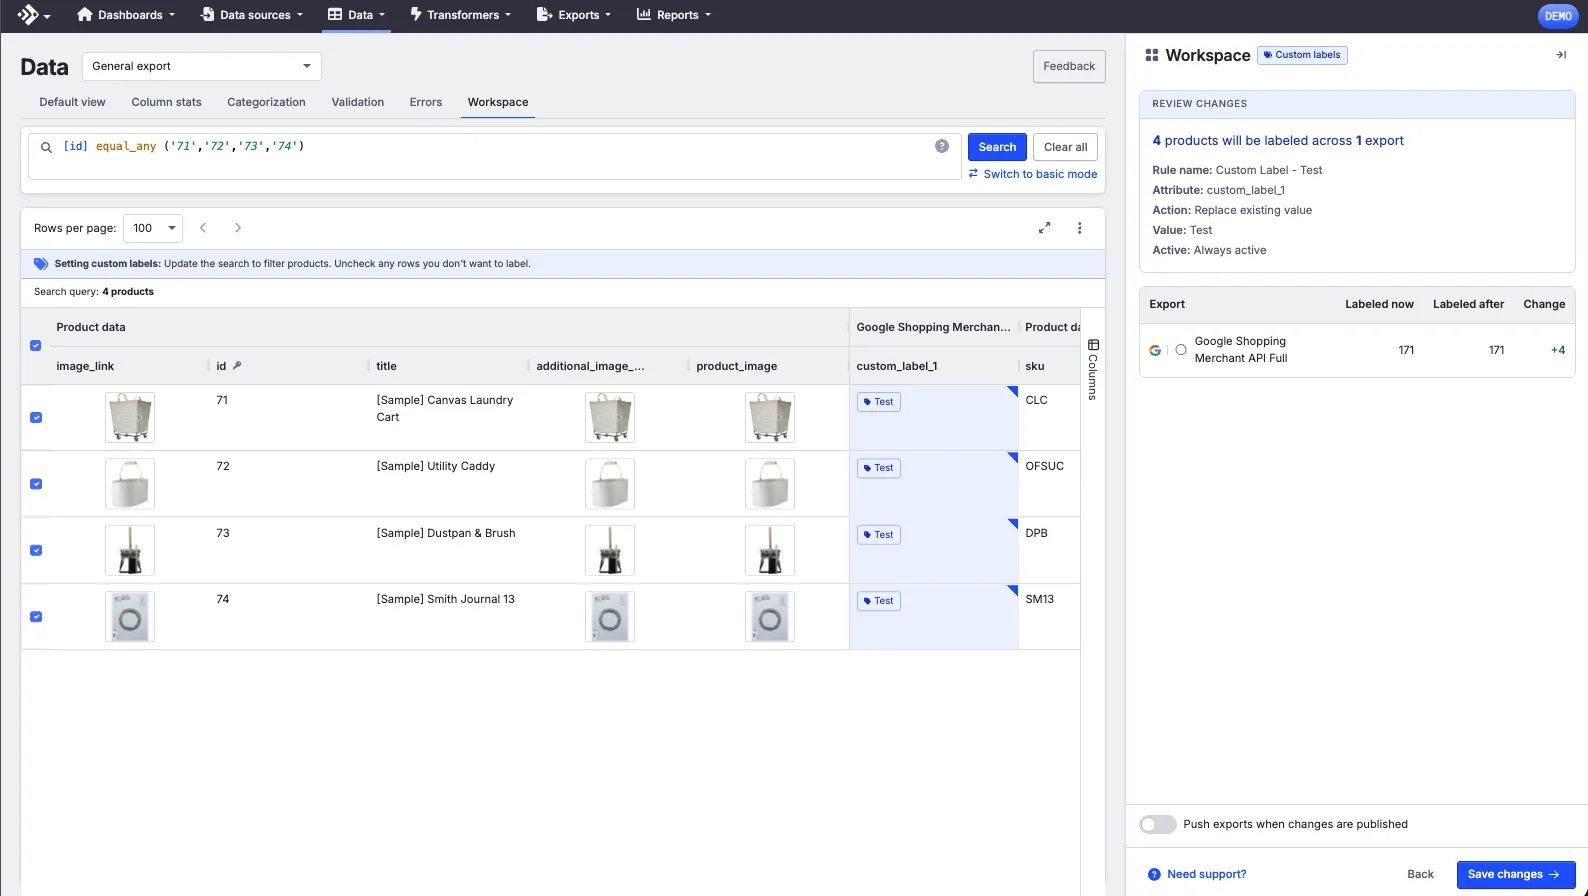
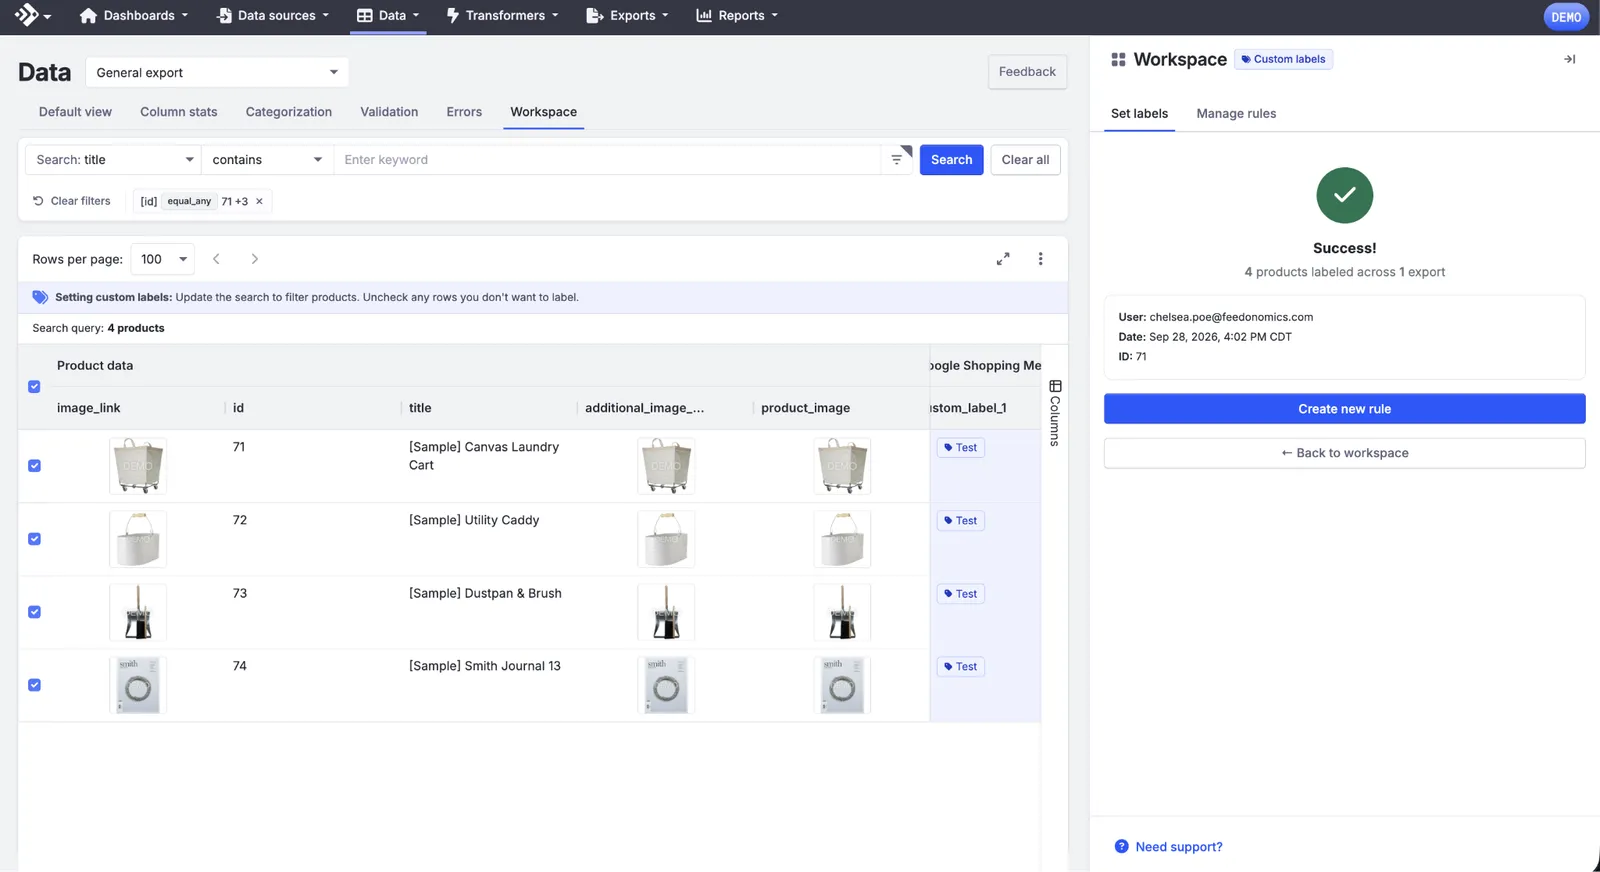
Turning the Push export when changes are published toggle on means both happen at once: the moment you select Save Changes, your export runs too. Leaving it off (the default) means your changes are saved, but you’ll need to wait for the export’s next scheduled run before your products actually update.
See which rules govern a field
A field governed by a Custom Label rule is flagged as “set by Custom Labels” in the data grid, row details, details fly-out, and the Transformers page, and can’t be edited or overridden there. To change it, edit the rule from Manage Rules.
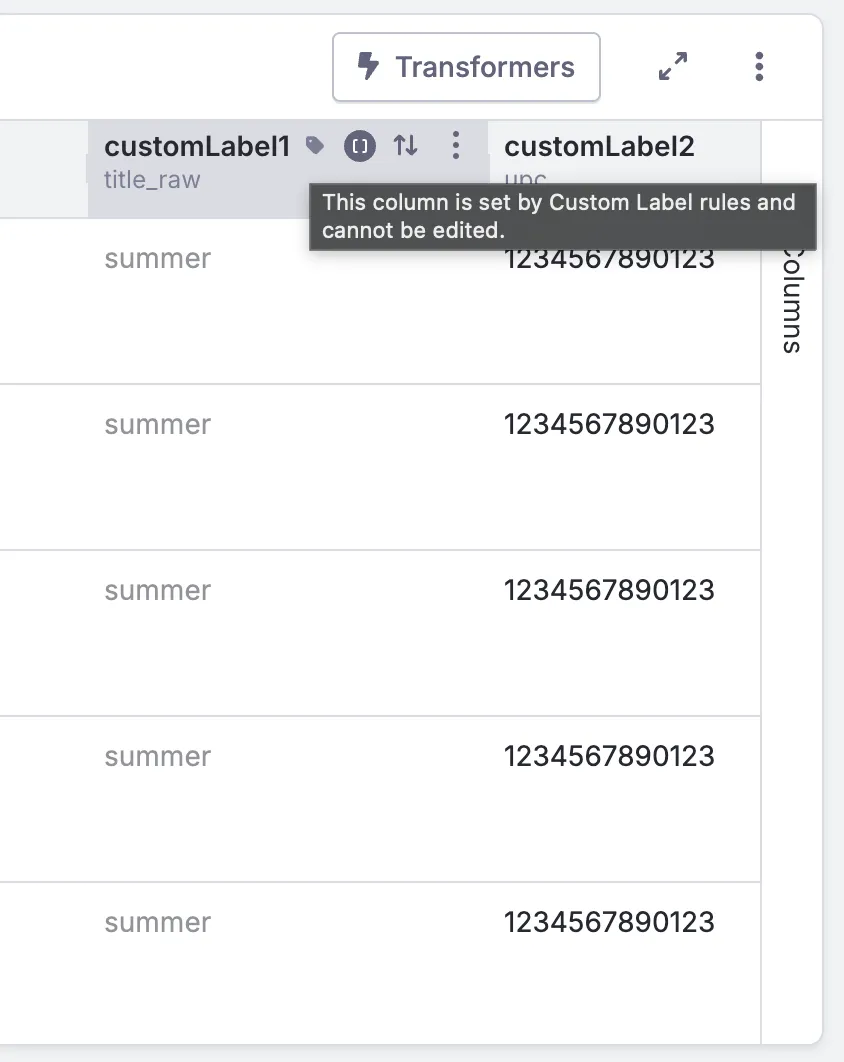
If a field has a Custom Label rule applied, the Transformers page shows a disclaimer that transformer logic can’t be used on that field where the rule governs it. The disclaimer is informational: it won’t disable the controls, and transformer logic still works for exports on that same field that don’t have a Custom Label rule, since a rule is scoped to one export while the Transformers page edits a field database-wide.
If a field already had a manual override and a Custom Label rule is then added, the override arrow no longer displays on that cell. The rule’s value is what publishes. Your original override value is preserved under the hood; the rule simply takes precedence in the grid.
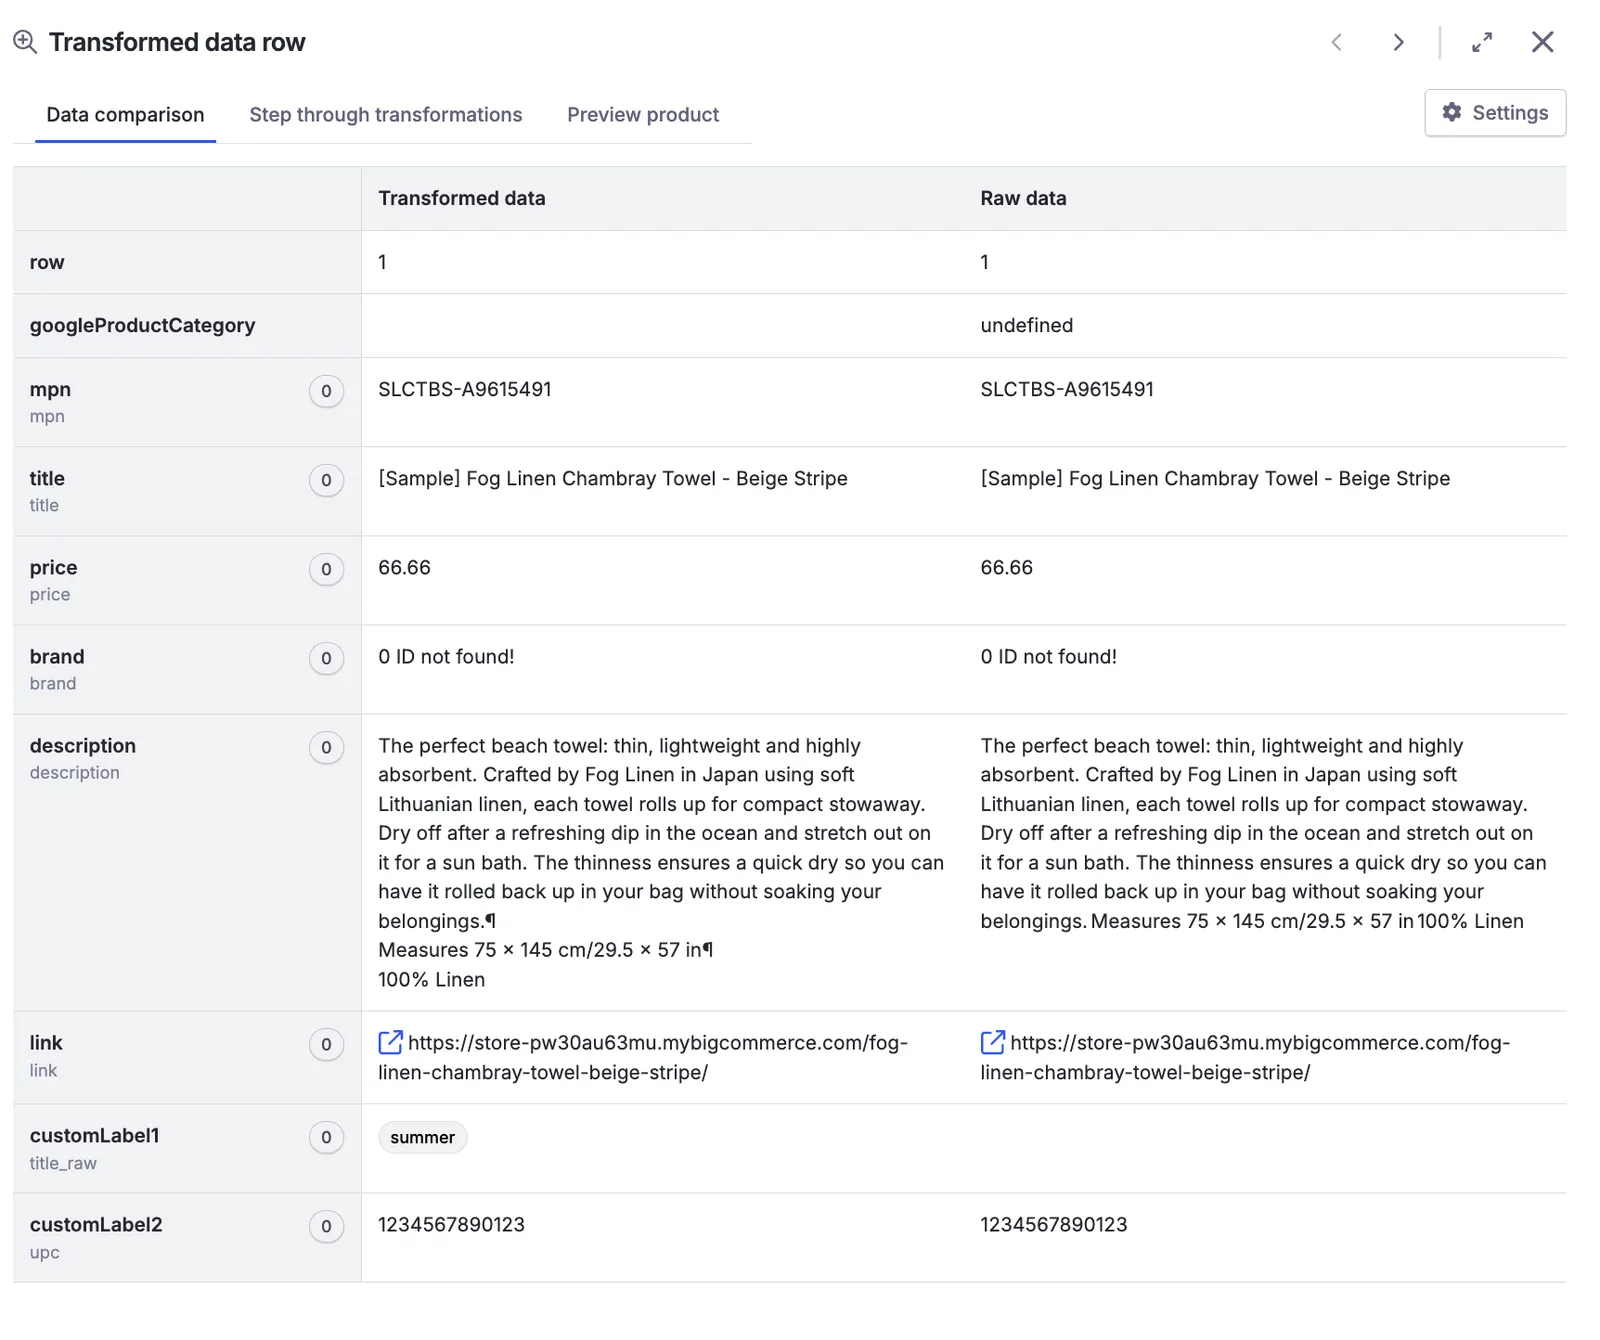
To investigate yourself:
Manage your rules
You can manage the rules you’ve created from the Manage Rules tab. There’s no need to rebuild anything from scratch if a value or product list needs to change.
Open Manage Rules
See every custom label rule created for the database or export.
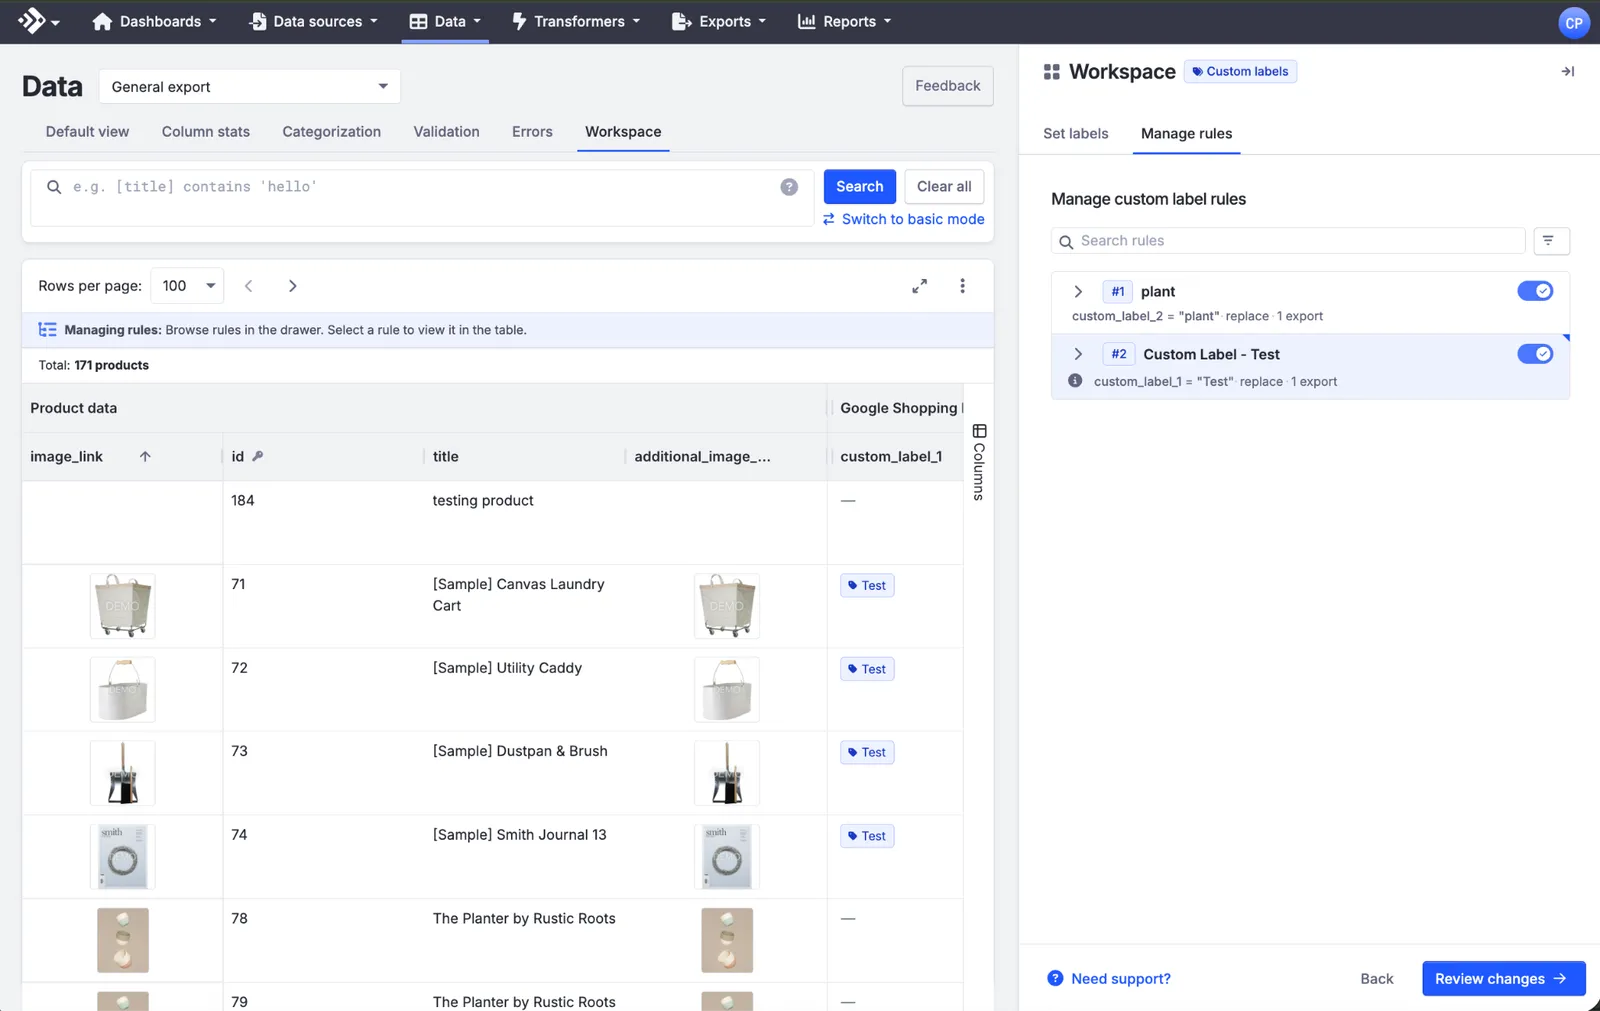
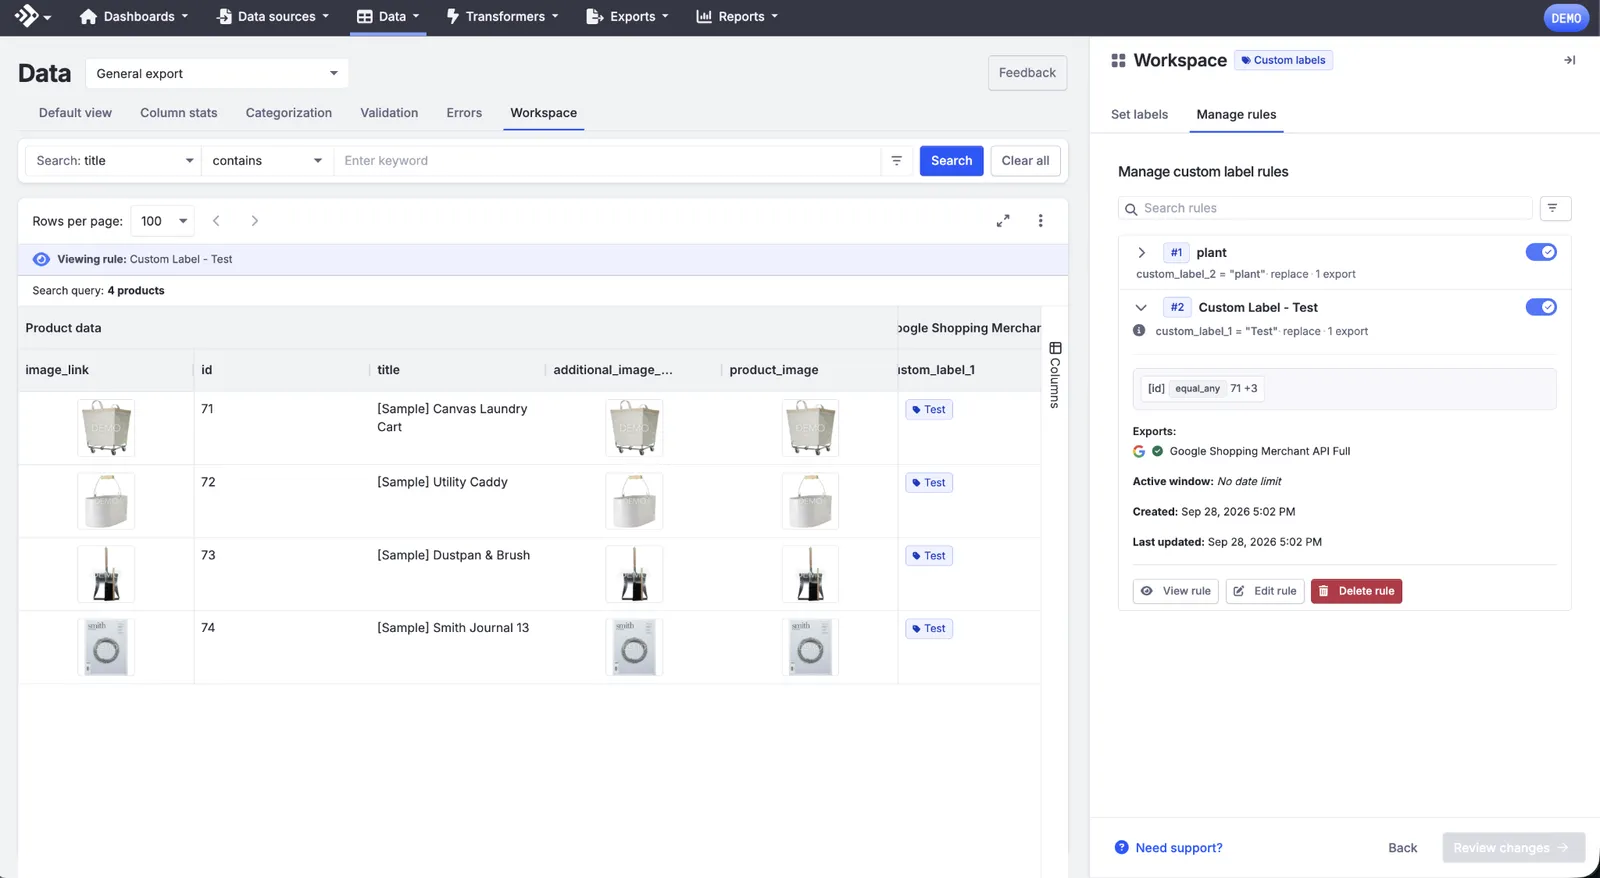
Toggle a rule on or off
Expand a rule to see its full criteria, exports, and history, and preview the impact before committing to the change.
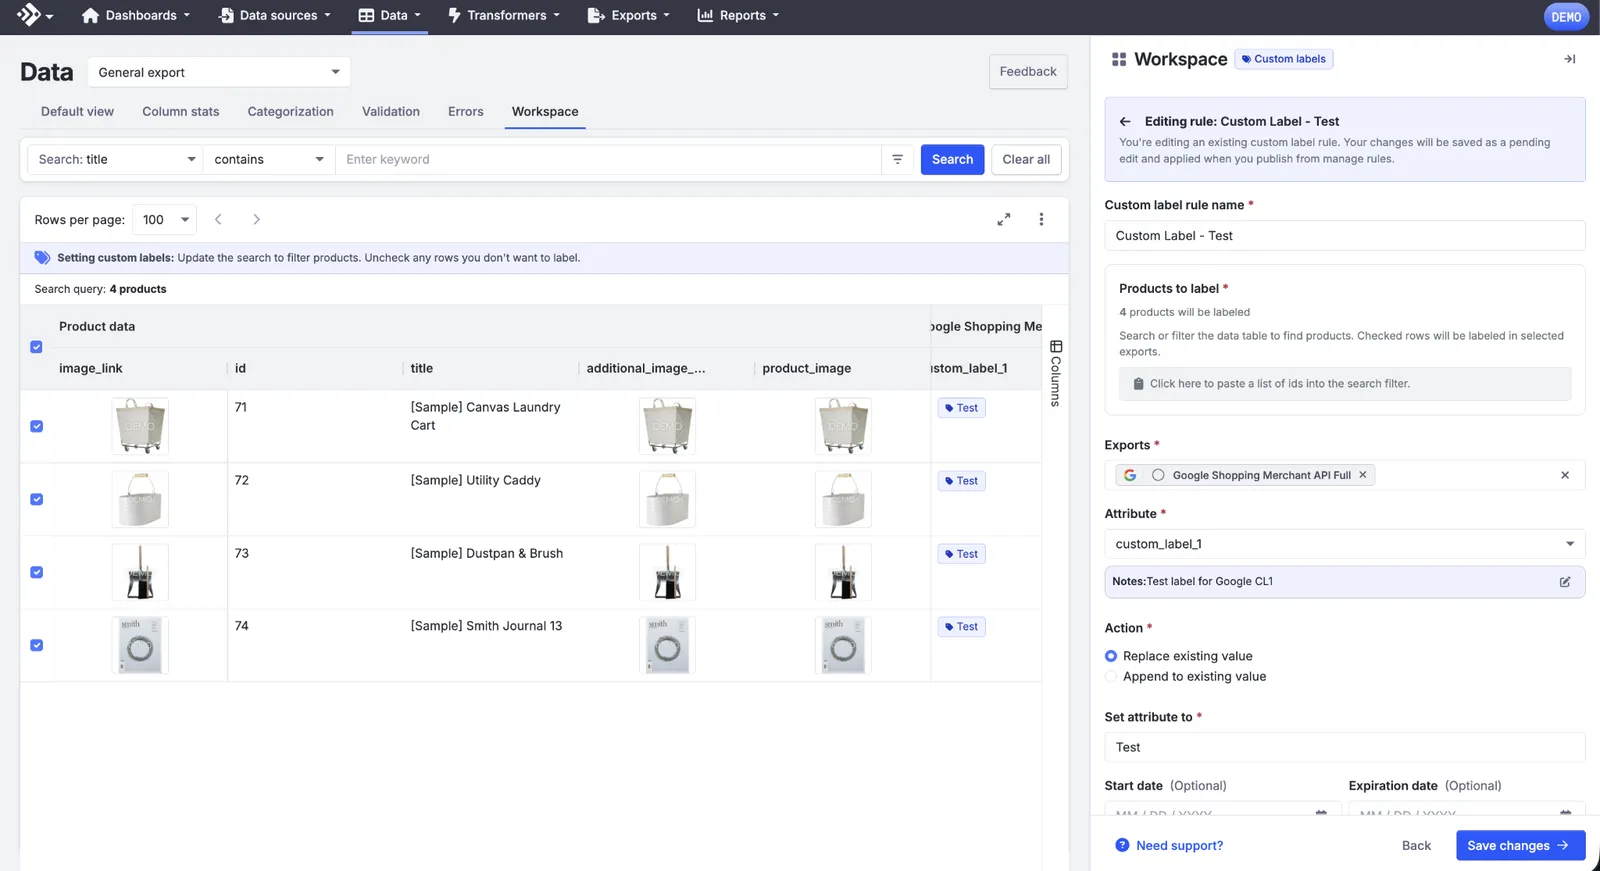
Edit a rule
Editing reopens the rule pre-filled with its current products, export, field, value, action, and dates.
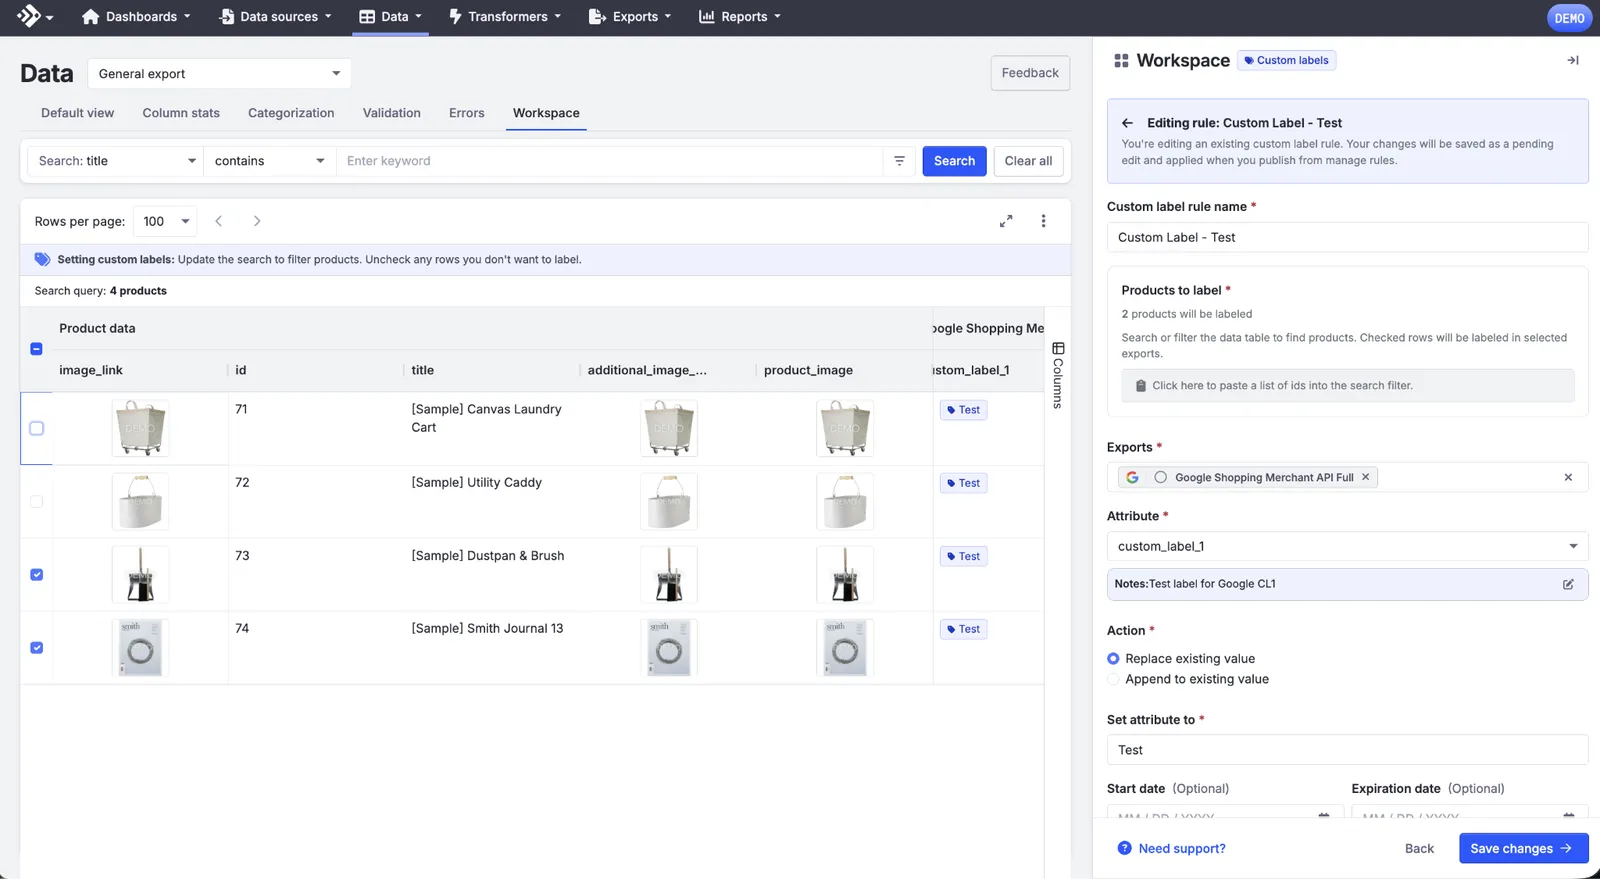
Edits are saved as a pending change and only go live once you publish from Manage Rules. A rule that’s been edited but not yet published shows a blue Edited tag in its top-right corner, so you can see at a glance which rules have pending changes. Every change here updates the draft immediately, so you always see the downstream impact before publishing.
Publish changes
Once you’ve reviewed a draft, you decide when it goes live.
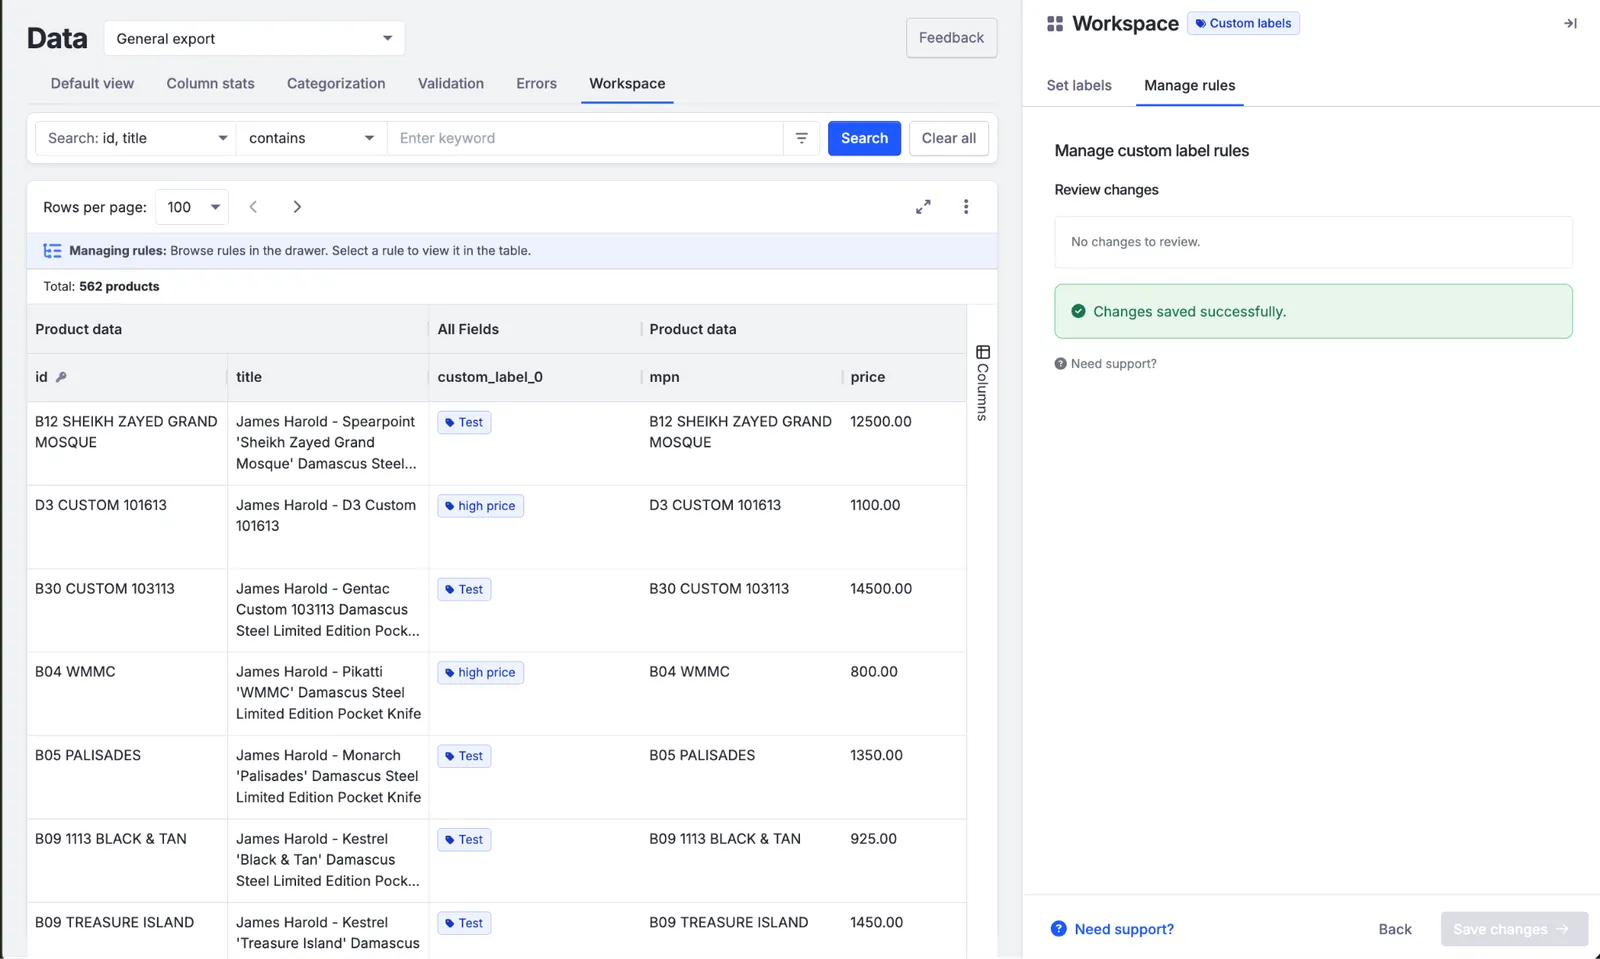
Every rule change, create, edit, enable/disable, delete, is logged with timestamp, user ID, and change details. Self-service changes are distinguishable from analyst-initiated ones.
Get help
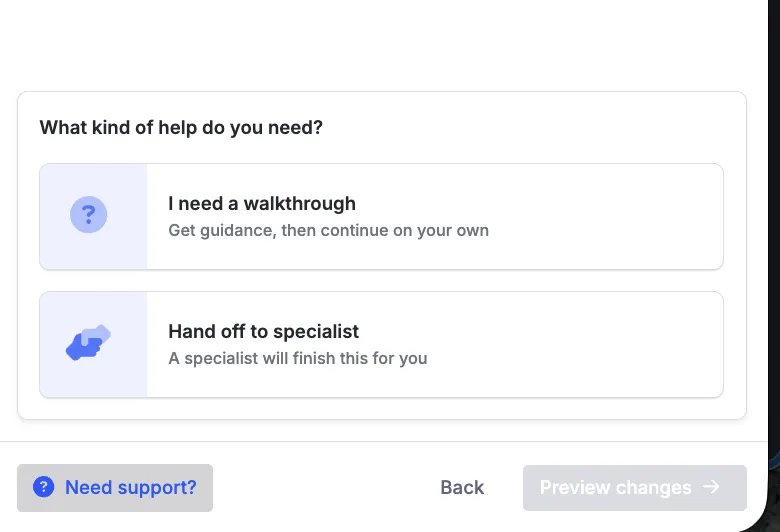
Most changes covered in this guide, such as applying a label, editing it, and managing existing rules, can be done yourself directly in the workspace. If you hit something the workspace can’t resolve, a Support Specialist can pick it up from exactly where you left off.
FAQ
What if I hit Google's 1,000-unique-value limit?
You’ll get a warning as you approach the threshold, and the system prevents you from exceeding it. Consider whether the field can be cleaned up or an expired label removed.
Can I use the same field for two different purposes?
Yes, a field can be reused over time. Check existing labels before repurposing so it’s clear what the field currently represents.
Can I still use transformer logic on a custom label field?
See See which rules govern a field above. The disclaimer is informational only, and transformer logic still works for exports on that field that don’t have a Custom Label rule.
Can I edit a custom label value directly in the data grid or on the Transformers page?
No. A field set by a Custom Label rule is immutable in the front end. To change it, edit the rule in Manage Rules.
How do I find which rules are applied to an export?
Open the export’s detail page and check the Rules field on the Settings tab, below Exclusions settings. See See which rules govern a field above.
This guide is a general reference. Specific steps or available options may vary slightly depending on your account setup.